Vortex
In this step we will install and configure Vortex, a mod manager from Nexus Mods designed with ease-of-use in mind.
This guide was written from a Vortex perspective as it's the mod manager I installed when I first started playing. I've stuck with it since 2019 and this guide naturally evolved through my personal experiences playing with it. I know some prefer Mod Organizer 2 for it's more direct control of plugin order and file conflict management, but I prefer the Vortex interface and its beginner-friendly automated mod management. Plus its newly added Collections feature makes maintaining this exhaustive list of mods in sandboxed, categorised form significantly easier. Viva New Vegas provides Mod Organiser 2 instructions. If you choose to use that instead, you'll have to download each mod I recommend manually since Collections currently work in Vortex only.
- Download the Vortex main file from here
- Once the download has finished, run the installer
- When prompted to choose an install location, pick any location outside of any default Window folders (Like
Program Files x86) and outside of the game's Root folder (The installer's default location will work) - Click Next until the installer finishes
- Run Vortex from the new Start Menu icon for it
- Log in with your Nexus Mods account via the Dashboard or the red silhouette icon in the top right so it can download mods for you, check for updates and use Collections
- Click on the 'Games' button on the left hand pane, search for New Vegas in the search bar then click 'Manage'
- Click on the 'Settings' icon on the left hand pane, go to 'Workarounds' and ensure under Archive Invalidation that the 'BSA redirection' slider is green
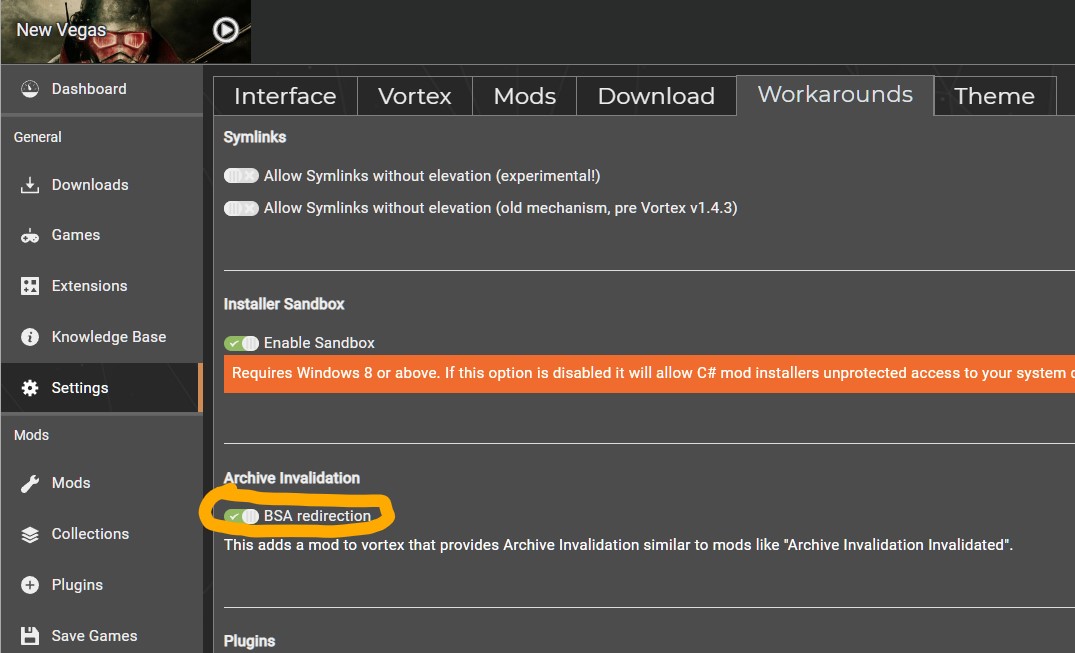
- Confirm this has installed correctly by going to your Mods tab and ensuring Vortex Archive Invalidation appears and is enabled
If you have Vortex installed on an SSD or a HDD with little space, you can open the Download tab in Settings to change the file path to a different drive with more space. This will not effect download/game performance, and the downloads can be deleted after the mods have been installed. Vortex will often automatically delete your downloaded mod zips after installation (they're extracted to a mod staging folder). You can also change the mod staging folder directory via the Mods tab, but I would suggest not doing that as I've personally not moved the staging folder before. I assume having your staging folder on a drive different to your game installation one may cause performance issues when deploying mods.
- In the top right, an automated notification pop-up should appear on the bell stating New Vegas Scrpt Extender (xNVSE) isn't installed. Click More and Download in the pop-up box. When you see the 'Mod Installed' box appear for New Vegas Script Extender (xNVSE), click 'Enable' then deploy. Double check it's installed by going to your 'Mods' tab on the left and make sure xNVSE appears as 'Enabled'
Creating Profiles
Vortex's "Profiles" feature allows for easy switching between different mod configurations with unique saves and INI settings. In this step, we will create a profile for the guide while keeping a strictly-vanilla profile for testing/de-bugging. Profiles can be selected via the drop-down menu above the left pane.
- Open the Settings menu on the left hand side of Vortex and slide the 'Enable Profile Management' to the right to enable Profiles.
- Select the new Profiles
 button on the left nav pane.
 - Under the New Vegas - Default profile, click the dropdown arrow then select Clone.
- Name the new profile Rebuilt: Core.
- Select the Edit button under Rebuilt: Core profile and enable the 'This profile has it's own game settings' slider. Repeat the same for the game saves slider as you wish.
- Clck the Profiles button and Enable under select the Rebuilt: Core profile.
Tweaking FalloutCustom.ini
In this step, we will configure the game's INI files to increase performance/stability. We will take advantage of JIP LN NVSE's FalloutCustom.ini feature to make our changes, which allows for INI changes to be made safely without editing the default INIs. Because of this, these changes will not take affect until you install JIP LN NVSE in Essentials.
- Make sure the Rebuilt: Core profile is active.
- Click the second to last folder icon
 along the top of Vortex in the Mods tab and select Open Game Settings folder.
 - Create a file called FalloutCustom.ini.
- Paste in the following:
Notes
It is highly recommended to avoid changing any other INI settings not in the guide, and to avoid using tools like BethINI. You will realistically not need any other tweaks than the ones already in the guide.